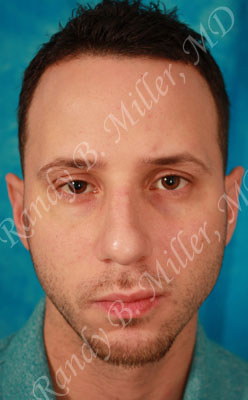
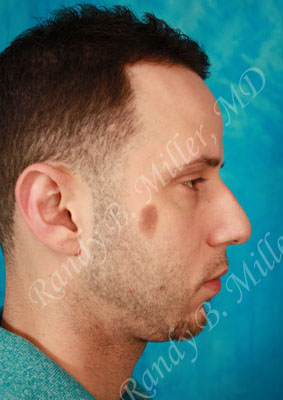
Before

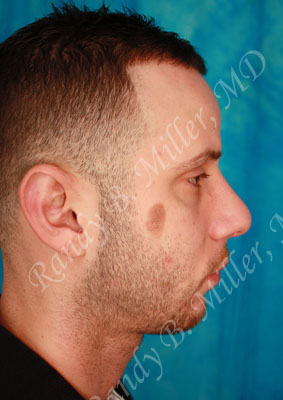
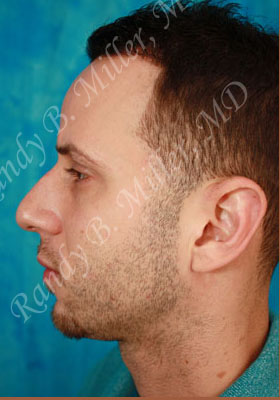
After

Before

After

Before

After
Before
After
Before

After
Before
After
Before
After
Before
After
Before
After
Before
After
TERMS OF USE
Please read these Terms of Use (“Terms”) carefully. These Terms are between you and MPS, MD, PA, also known as Miller Plastic Surgery (“Site”). These Terms cover your use of this website, www.millerplasticsurgery.com and the services and information available on this website. You accept these Terms by accessing or using the Site and you agree to be bound by these Terms and Privacy Policy. If you do not agree to abide by or be bound by these Terms, then do not access the Site.
1. Modification.
Miller Plastic Surgery reserves the right to make changes to the website, Privacy Policy and other content. For all users, these Terms are effective as of the date of published changes and supersede all previous versions of Miller Plastic Surgery’s Terms. If any condition shall be deemed invalid, void or for any reason unenforceable, then that condition shall be deemed severable and shall not affect the validity of the remaining conditions. Your continued use of the Site after any such changes are posted constitutes your acceptance of the new Terms. If you do not agree to abide by these or any future Terms, you may not use or access the Site.
2. No Medical Advice.
The content, including but not limited to text, graphics, images or other material contained on the Site is for educational/informational purposes only, and is not a substitute for diagnosis, treatment, or medical advice that would be provided by a qualified health care professional. Your reliance on any information or Content provided on the Site, whether or not it is provided by a health care professional, is solely at your own risk. You should always seek the advice of your physician or health care professional for any questions you may have about your own medical condition.
3. No Minors.
You may not access the Site if you are under 18 years of age.
4. Your Service Account; Email Consent.
In order to use some of the features on the Site, you may be asked to register and provide information about yourself. By utilizing the Site, you consent to receive emails from Miller Plastic Surgery, which may include commercial emails provided such emails are in accordance approved by Miller Plastic Surgery.
5. Products and Service Endorsements.
Miller Plastic Surgery does not endorse or recommend any specific content, procedures, products, opinions, or any other material or information available on the Site.
6. Nudity
There may be medical related or health related materials posted by Miller Plastic Surgery or other third parties that may contain nudity. If you find these materials to be offensive, then you may want to use the Site or Service in such a way as to limit your viewing of this material.
7. Photograph/Video Policy.
Health care professionals must have consent from individuals and follow all HIPAA requirements (as well as Miller Plastic Surgery’s Privacy Policy and Terms Of Use) before uploading, submitting or posting any patient photographs or videos.
8. Performance and Usage Information.
We may automatically upload performance and usage data for evaluating the Site and the software associated with the Site. This data will not personally identify you.
9. Links to Other Websites.
The Service may contain links to other websites maintained by third parties (“Third Party Website”) or you may be able to log into the Service through a Third Party Website. Third Party Websites are not under the control of Miller Plastic Surgery and Miller Plastic Surgery does not endorse or assume any responsibility for the content, information or functionality of any Third Party Website. As a result, your access or use of any Third Party Website is at your own risk and Miller Plastic Surgery’s Terms of Use and Privacy Policy and any other policies do not apply or govern any Third Party Website. You expressly relieve Miller Plastic Surgery of any and all liability related to the functionality, content or information contained on any Third Party Website. In addition, your dealings with or participation in promotions of third parties found on a Third Party Website, including payment and delivery of goods or services any other terms (such as warranties) are solely between you and the third parties. You agree that Miller Plastic Surgery shall not be responsible for any loss or damage of any kind relating to your dealings with such third parties.
10. MILLER PLASTIC SURGERY DISCLAIMS ALL WARRANTIES.
We provide the Service “as-is,” “with all faults” and “as available.” The Miller Plastic Surgery and its affiliates disclaim all warranties, guarantees or conditions. Without limiting the foregoing, to the extent permitted by law, we exclude and disclaim all implied warranties, including those of merchantability, fitness for a particular purpose, workmanlike effort and non-infringement. IN ADDITION, IN NO EVENT SHALL MILLER PLASTIC SURGERY BE LIABLE TO YOU OR TO ANYONE FOR ANY DECISION MADE OR ACTION TAKEN BY A PARTY (INCLUDING, WITHOUT LIMITATION, BY ANY USER) IN RELIANCE ON ANY CONTENT OR OTHER INFORMATION ABOUT PROFESSIONALS OR PROCEDURES POSTED ON THE SITE.
11. Jurisdiction.
Miller Plastic Surgery controls and operates the Site from the United States of America in Miami in Miami Dade County, Florida. These Terms and the Service are governed by United States federal law and the laws of the State of Florida, excluding any conflicts of law provisions. Accessing, browsing or otherwise using the Site means you hereby consent to the exclusive jurisdiction of the state and federal courts in Miami Dade County, Florida and you waive all defenses of lack of personal jurisdiction and forum non conveniences with respect to venue and jurisdiction in the state and federal courts of Miami Dade County, Florida.
12. Indemnification.
You agree to indemnify and hold harmless Miller Plastic Surgery from and against any loss, liability, claim, demand, damages, costs and expenses, including reasonable attorney’s fees, arising out of or in connection with any content you post or submit to or through the Service, your use of the Service, your conduct in connection with the Service or with other users of the Site, and any violation of this contract or of any law or the rights of any third party.
13. Claim Must Be Filed Within One Year; Arbitration.
Any dispute, claim or controversy arising out of or relating to these Terms, Miller Plastic Surgery or the Site or the breach, termination, enforcement, interpretation or validity thereof, including the determination of the scope or applicability of this agreement to arbitrate, shall be determined by final and binding arbitration as the sole and exclusive remedy for such controversy or dispute. Any claim shall be made by filing a demand for arbitration within one (1) year following the event first giving rise to the claim. The arbitration shall be held in Miami Dade County, Florida before one arbitrator. The arbitration shall be governed by the Federal Arbitration Act and the arbitration shall take place according to the rules of the American Arbitration Association. Judgment on the Award may be entered in any court having jurisdiction. Each of the party’s shall bear all of its own costs of arbitration except the fee for the arbitrator shall be equally split between the parties. The arbitrator shall not have the authority to modify these Terms or award punitive or exemplary damages to either party. This clause shall not preclude parties from seeking provisional remedies in aid of arbitration from a court of appropriate jurisdiction. Seeking any such remedies shall not constitute a waiver of either party’s right to compel arbitration.
14. Miscellaneous.
These Terms constitute the entire agreement between you and Miller Plastic Surgery regarding the use of the Site, and supersedes any prior agreements between you and Miller Plastic Surgery relating to your use of the Site. The failure of Miller Plastic Surgery to exercise or enforce any right or provision of these Terms or any prior version of these Terms shall not constitute a waiver of such right or provision in that or any other instance. If any provision of these Terms is held invalid, the remainder of these Terms shall continue in full force and effect. If any provision of these Terms shall be deemed unlawful, void or for any reason unenforceable, then that provision shall be deemed severable from these Terms and shall not affect the validity and enforceability of any remaining provisions.
PRIVACY POLICY
www.millerplasticsurgery.com or other web sites owned or operated by Miller Plastic Surgery (the “Miller Plastic Surgery Sites”) value and respect your privacy. This Privacy Notice details important information regarding the use and disclosure of your information collected on the Miller Plastic Surgery Sites. Miller Plastic Surgery provides this Privacy Notice to help you make an informed decision about whether to use or continue using the Miller Plastic Surgery Sites. This Privacy Notice is incorporated into and is subject to the Miller Plastic Surgery Terms of Use. Your utilization of the Miller Plastic Surgery Sites and any personal information you provide on the Miller Plastic Surgery Sites remains subject to the terms of this Privacy Notice and our Terms of Use.
Protecting the privacy of minors is especially important. For that reason, Miller Plastic Surgery does not knowingly collect or maintain personally identifiable information or non-personally-identifiable information on the Miller Plastic Surgery Sites from persons under 18 years of age, and no part of our website is directed to persons under 18. If you are under 18 years of age, then please do not use or access the Miller Plastic Surgery Sites at any time or in any manner.
If Miller Plastic Surgery learns that personally identifiable information of persons under 18 years of age has been collected on the Miller Plastic Surgery Sites without verified parental consent, then Miller Plastic Surgery will take the appropriate steps to delete this information.
The Miller Plastic Surgery Sites are hosted in the United States and are intended for and directed to Users in the United States. If you are a User accessing the Miller Plastic Surgery Sites from the European Union, Asia, or any other region with laws or regulations governing personal data collection, use, and disclosure that differ from United States laws, please be advised that through your continued use of the Miller Plastic Surgery Sites, which are governed by U.S. law, this Privacy Notice and our Terms of Use, you are transferring your personal information to the United States and you consent to that transfer.
You provide certain personally identifiable information (such as your name and email address) to Miller Plastic Surgery Sites when choosing to participate in various activities on the Miller Plastic Surgery Sites such as posting messages, taking advantage of promotions, responding to surveys, or subscribing to newsletters or other mailing lists. In addition, if you provide your third-party account information (e.g., your log-in information for Facebook or other third party sites) to us, you understand that if you authorize the transmissions, some content and/or information in those accounts may be transmitted to Miller Plastic Surgery Sites. This Privacy Policy governs any third party account information that is transmitted to Miller Plastic Surgery.
When you visit the Miller Plastic Surgery Sites, we may send one or more cookies – a small text file containing a string of alphanumeric characters – to your computer that uniquely identifies your browser. Miller Plastic Surgery uses both session cookies and persistent cookies. A persistent cookie remains after you close your browser. Persistent cookies may be used by your browser on subsequent visits to the site. Persistent cookies can be removed by following your web browser help file directions. A session cookie is temporary and disappears after you close your browser. You can reset your web browser to refuse all cookies or to indicate when a cookie is being sent. However, some features of the Miller Plastic Surgery Sites may not function properly if the ability to accept cookies is disabled.
When you use the Miller Plastic Surgery Sites, we may employ “clear gifs” (a.k.a. Web Beacons) which are used to track the online usage patterns of our Users anonymously (i.e., in a non-personally-identifiable manner). In addition, we may also use clear gifs in HTML-based emails sent to our Users to track which emails are opened by recipients.
When you use the Miller Plastic Surgery Sites, our servers automatically record certain information that your web browser sends whenever you visit any website. These server logs may include information such as your web request, browser type, browser language, Internet Protocol (“IP”) address referring / exit pages and URLs, platform type, number of clicks, domain names, landing pages, the date and time of your request, pages viewed and the order of those pages, the amount of time spent on particular pages, and one or more cookies that may uniquely identify your browser.
We do not use your email address or other personally identifiable information to send commercial or marketing messages without your consent or except as part of a specific program or feature for which you will have the ability to opt-in or opt-out. We may, however, use your email address without further consent for non-marketing or administrative purposes such as notifying you of major Miller Plastic Surgery Sites changes or for customer service purposes.
We use both your personally identifiable information and certain non-personally-identifiable information (such as anonymous User usage data, cookies, IP addresses, browser type, clickstream data, etc.) to improve the quality and design of the Miller Plastic Surgery Sites and to create new features, promotions, functionality, and services by storing, tracking, and analyzing Miller Plastic Surgery users’ trends and preferences. We use cookies, clear gifs, and log file information to: (a) remember information so that you will not have to re-enter it during your visit or the next time you visit the Miller Plastic Surgery Sites; (b) provide custom, personalized content and information; (c) monitor the effectiveness of our marketing campaigns; (d) monitor aggregate metrics such as total number of visitors, pages viewed, etc.; and (e) track your entries, submissions, and status in promotions and other offers.
Miller Plastic Surgery Sites provides personally identifiable information and non-personally identifiable information to our subsidiaries, affiliated companies, or other businesses or persons for the purpose of processing such information on our behalf. We require that these parties agree to process such information in compliance with our privacy policy, and we use reasonable efforts to limit their use of such information and to use other appropriate confidentiality and security measures.
However, we do not share your personally identifiable information (such as name or email address) with other, third-party companies for their commercial or marketing use without your consent or except as part of a specific program or feature for which you will have the ability to opt-in or opt-out.
We do share non-personally-identifiable information (such as anonymous User usage data, referring / exit pages and URLs, platform types, number of clicks, etc.) with interested third-parties to assist them in understanding the usage patterns for certain content, services, advertisements, promotions, and/or functionality on the Miller Plastic Surgery Sites.
Miller Plastic Surgery Sites may release personally identifiable information and/or non-personally identifiable information if required to do so by law, or in the good-faith belief that such action is necessary to comply with state and federal laws (such as U.S. Copyright Law) or respond to a court order, subpoena, or search warrant.
Miller Plastic Surgery Sites also reserves the right to disclose personally identifiable information and/or non-personally identifiable information that Miller Plastic Surgery believes, in good faith, is appropriate or necessary to enforce our Terms of Use, take precautions against liability, to investigate and defend itself against any third-party claims or allegations, to assist government enforcement agencies, to protect the security or integrity of the Miller Plastic Surgery Sites, and to protect the rights, property, or personal safety of Miller Plastic Surgery Sites, it’s users or other parties.
In the event that any of the Miller Plastic Surgery Sites are acquired by or merged with a third party entity, we reserve the right, in any of these circumstances, to transfer or assign the information we have collected from our Users as part of such merger, acquisition, sale, or other change of control. In the event of Miller Plastic Surgery Sites bankruptcy, insolvency, reorganization, receivership, or assignment for the benefit of creditors, or the application of laws or equitable principles affecting creditors rights generally, we may not be able to control how your personal information is treated, transferred, or used.
Miller Plastic Surgery allows other companies, called third-party ad servers or ad networks, to serve advertisements within the Miller Plastic Surgery Sites. These third-party ad servers or ad networks use technology to send, directly to your browser, the advertisements and links that appear on the Miller Plastic Surgery Sites. They automatically receive your IP address when this happens. Miller Plastic Surgery does not provide any personally identifiable information to these third-party ad servers or ad networks without your consent or except as part of a specific program or feature for which you will have the ability to opt-in or opt-out.
You should consult the respective privacy policies of these third-party ad servers or ad networks. Miller Plastic Surgery’s privacy policy does not apply to, and we cannot control the activities of, such other third parties.
Miller Plastic Surgery Sites use commercially reasonable physical, managerial, and technical safeguards to preserve the integrity and security of your personal information. We cannot, however, ensure or warrant the security of any information you transmit to Miller Plastic Surgery Sites and you do so at your own risk. Once we receive your transmission of information, Miller Plastic Surgery makes commercially reasonable efforts to ensure the security of our systems. However, please note that this is not a guarantee that such information may not be accessed, disclosed, altered, or destroyed by breach of any of our physical, technical, or managerial safeguards.
If Miller Plastic Surgery Sites learns of a security systems breach, then we may attempt to notify you electronically so that you can take appropriate protective steps. Miller Plastic Surgery may post a notice on the Miller Plastic Surgery Sites if a security breach occurs. Depending on where you live, you may have a legal right to receive notice of a security breach in writing.
This Privacy Notice may be revised periodically. Please revisit this page to stay aware of any changes. In general, we only use your personal information in the manner described in the Privacy Notice in effect when we received the personal information you provided. Your continued use of the Miller Plastic Surgery Sites constitutes your agreement to this Privacy Notice and any future revisions.